Frequently Asked Questions
- About our accounts
- What does 'Manual Verification' mean, and how long do I have...?
- How do I close my account?
- How do I get my email for life?
- Do I get a free trial?
- I'm still at University, can I renew my account for free?
- Email Account How-Tos
- How do I renew a FREE subscription?
- How do I automatically forward my emails to another account?
- How do I see how much of my email quota I am using, and where?
- How do I change my email address or username?
- How do I upgrade my account?
- How do I renew my existing subscription?
- How do I use multiple identities?
- How do I set up email filters?
- Email account user guides
- Email Client Guides
- Getting started
- New Graduate FAQ
- How do I import my emails and contacts from my student account?
- Which account option should I choose?
- Glossary
- Most Common Questions
- How do I set up an Out of Office automated response?
- What is the total maximum file size an email attachment can be?
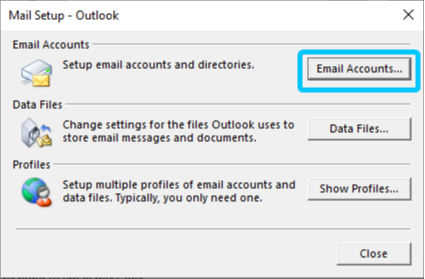
- Outlook Classic App Setup Guide
- Phone Support
- Aliases
- How do I set up/manage my aliases?
- How can I archive my emails for safekeeping or transfer?
- Apple Mail App Setup Guide
- Apple Mail Client Guide
- Outlook Setup Guide
- I can't send/receive emails from my mail client/phone.
- How do I Block or mark an email address as safe?
- Tips and information
- Troubleshooting
What is an Alias?
Your Email account will come with a number of Aliases that you may wish to use as another email address for your account. When an email is sent to an Alias, it will be delivered to your main email addresses inbox.
This is useful if you wish to set up another email address for different contacts, or if your name has changed recently.
Aliases are like giving your house a name. For example, let's say your address is 9 Colne Road, but you have put up a sign calling it The Orchard. Your address is still 9 Colne Road, and your post will still be delivered there. But it is also known as The Orchard, so post addressed to The Orchard will also be delivered.
How many Aliases can my account have?
You can view how many Email Aliases your Account can have by going to the My Account dashboard after logging in. Once here, click on Email Accounts on the left hand side. You will see the Aliases displayed in the Account information:
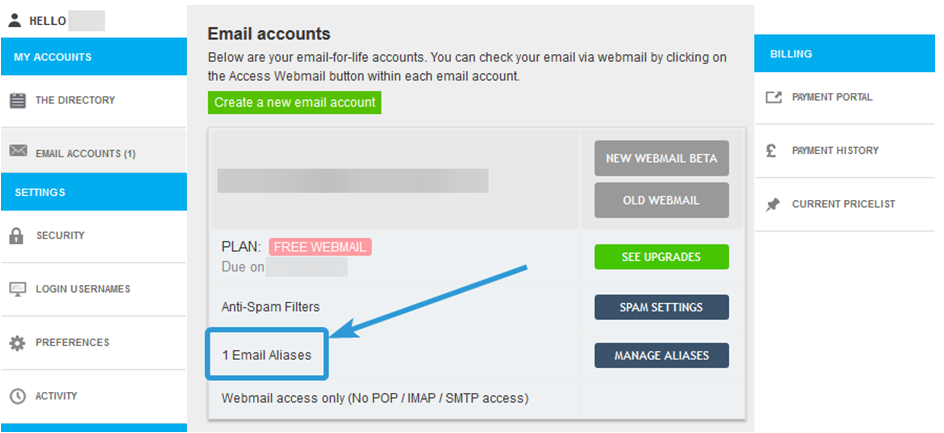
Your account will include at least one free Alias. If you have upgraded your Account, you will have access to more Aliases. To view how many Aliases each of our Packages includes, you can visit our help guide here.
To edit or set up your Aliases, you can click on the Manage Aliases button. You can find a help guide that details this more here.
If you have any questions about Aliases, please contact our helpdesk at help@aluminati.net
Aliases allow you to set up an additional email address on your account. To read more about Aliases, please see our help guide here.
You can set up and manage your Aliases by logging in to your Account and going to the My Account dashboard. If you are logged in to your webmail inbox, you can access My Account by clicking on the button in the top right of the page.
On the My Account page, you will be able to click on Email Accounts on the left. This will show you all the email accounts you currently own. Each of your email accounts will have a Manage Aliases button. It will also list how many Aliases you can have on your email account.

Clicking on Manage Aliases will take you to the page in order to set up or edit your Aliases.
If you are already using all of your Aliases and would like more, you can click on Purchase. This will take you to the Payment Portal, and you can select a Package or Bolt-On if you would like more Aliases.
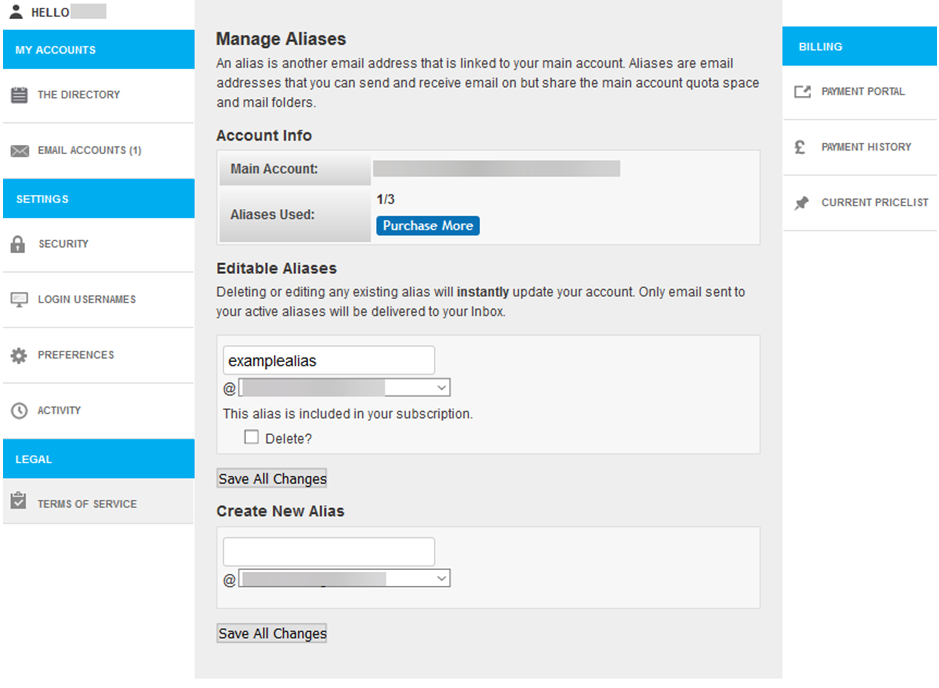
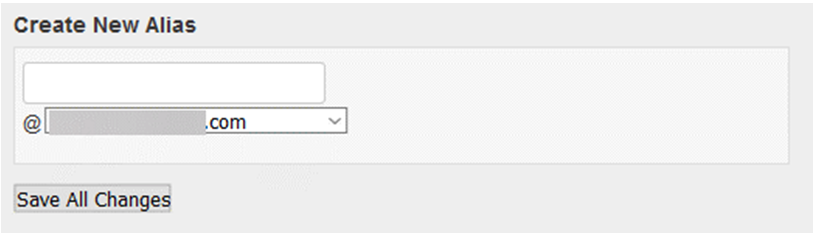
- To add an Alias: Use the Create New Alias box to set up a new Alias. You can choose what address the Alias has, and can select which domain you wish to use from the dropdown. You can then click Save All Changes to save your new Alias.
- To edit an Alias: If you have an Alias already set up, it will appear in the Editable Aliases section. If you wish to change the Alias address, simply change it in the text box. You can also choose a different domain if these are available, by selecting this from the dropdown box. You can then click Save All Changesto save the changes you have made.
You can update an Alias as much as you want, but when you update it, it will delete the old one. If an email is then sent to the old Alias, it will be bounced back to the sender. The new Alias you have set up will be active immediately, and emails can be sent to it as soon as you have saved it.
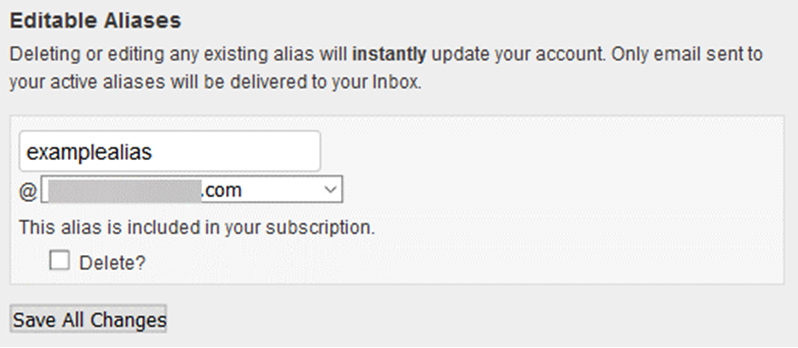
- To delete an Alias: If you wish to remove an Alias completely, you can select the Delete? Tickbox in the Editable Aliases section. Once you have ticked this box, you can click Save All Changes to remove the Alias from your email account.
If an email is then sent to the deleted Alias, it will be bounced back to the sender.
If you would like to set up your email account to send emails from your alias, you can set it up as a Multiple Identity. You can read more about Multiple Identities in our help guide here.
If you have any questions about setting up or editing your Aliases, please contact our helpdesk at help@aluminati.net
- Log into Webmail and select the email you would like to archive
- Then click on More and select Download (.eml)
- The email will then be downloaded to a file on your device
If you want to archive more than 100 messages at a time (This option is only available for paid accounts)
(This method is best if you want to archive more than 100 messages at a time, and is generally recommend as a much more convenient way of downloading emails to your computer.)
Set up a mail client (such as Outlook, Thunderbird, or Mac Mail) to connect with your account via IMAP. If you are not sure how to do this, this article will help you.
Once you have your email account set up, just drag and drop the chosen messages to a local folders file on your computer. At this point you will want to make sure your computer is backed up, as those files will no longer be on our servers.
Some account packages come with access to IMAP/POP/SMTP, which allows them to be added to an Email Program or App. If you are unable to send or receive emails from your Account on an email program or app, please follow the troubleshooting steps below.
Check your account package
If you are repeatedly informed that your username/password is invalid despite it being entered correctly, it could be that you have an account without IMAP/POP/SMTP access.
You can find out if your account has this enabled by logging in to the My Account dashboard. If you click on Email Accounts on the left, you will see details of your email account and what Package it is currently using. It will also list if your account has access to IMAP/POP/SMTP.

If you do not have access to IMAP/POP/SMTP, it will be shown as Webmail access only:

If you wish to upgrade your account to include this feature, you can do so by clicking on the See Upgrades button on the same page.
Check the settings of your email program or app
If your Account is set up with IMAP/POP/SMTP access, you will have to check the settings for your Account in your Email Program or App. If you are unable to find where these settings are, please refer to the help guides that came with the Email program or app you are using.
The settings will need to be set up as follows, depending if you are using IMAP or POP, and if you wish to use Secure or Standard connections:
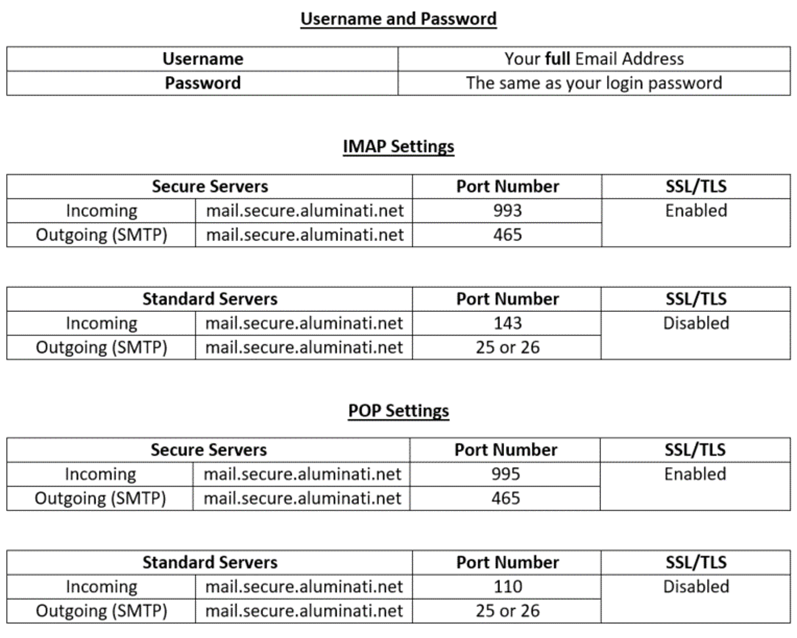
Check username and password fields even where 'optional'
In your client's account settings, you need to make sure the username and password are filled in even if it says the information is optional. You will need to enter your full email address in to the username field.
Change port number
If you can receive emails but are unable to send them, check your outgoing server settings. If the port is 25, try changing it to 26. Some ISPs block port 25 to try and cut down on the amount of spam sent from their networks. Changing it to 26 usually circumvents this, though in some instances port 26 will also be blocked, and port 587 should be tried instead.
Please refer to the settings above for details of the different configurations that can be used to set up your email address.
Contact us
If none of the solutions here have worked for you, please contact our helpdesk at help@aluminati.net with your email address, the full error message you are receiving, and as much information as possible about what issue you are experiencing.
If needed, you can set up an Out of Office autoreply for your account. This is useful for alerting anyone emailing you that you are currently not able to access your Emails. See below for how to set this up in Webmail
Webmail
To set up an Out of Office autoreply using Webmail, simply log in to your webmail account and Follow the steps below:
- Go to Settings found in the top right hand of the screen.
- Go to the Out of Office section.
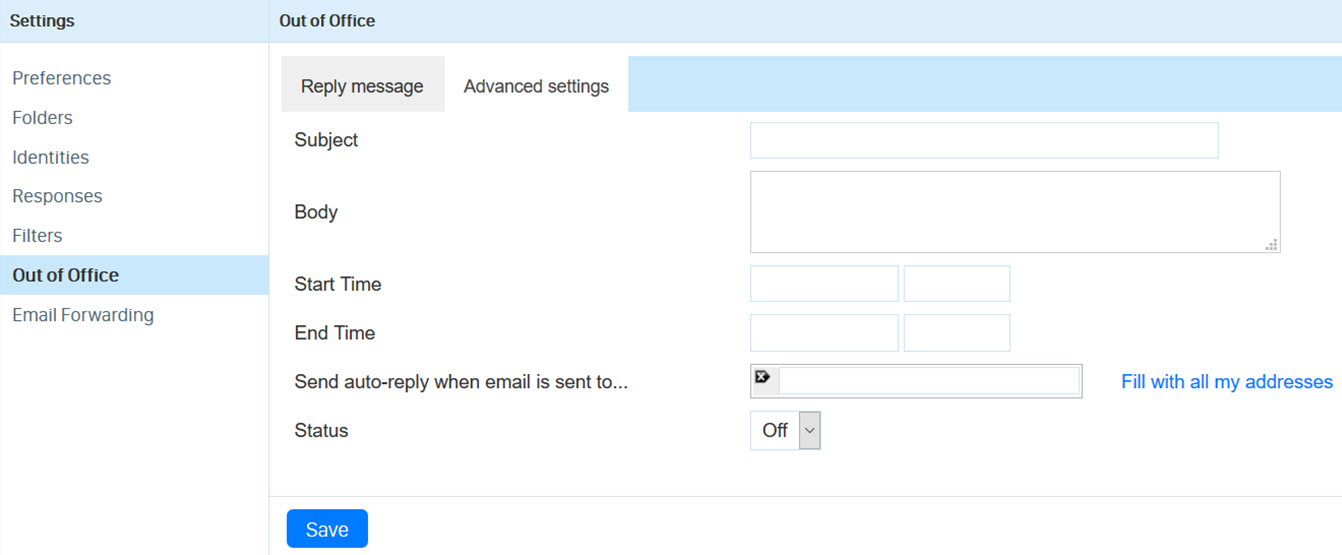
- Here you can add a Subject and Body text of the auto response you would like (just like a normal email). The Subject will be the subject for the Email, and the Body will be the main email message.
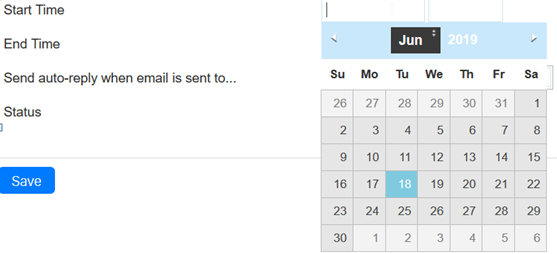
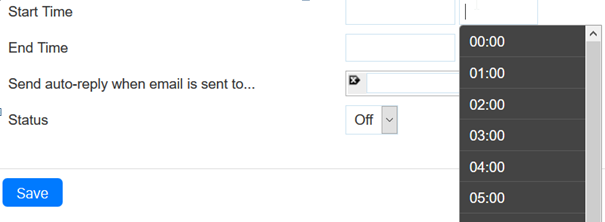
- In the Start Time and End Time boxes, you can set the dates and times you want the Autoreply to be active between. Clicking on these boxes will bring up a small calendar/time list for you to select from.
- The Send auto-reply when email is sent to... allows you to specify which alias on your account you want the auto reply to work for. For more about Aliases, you can read our help guide here.
- Status allows you to turn the autoreply on and off.
- When you have finished creating or editing your auto response, click the Save button at the bottom.
If you have any further issues setting up a automated response, please contact our helpdesk at help@aluminati.net
What are the Block/Safe lists?
- Block list allow you to completely block an email address or domain from coming into your email account.
- Safe list allow an email address or domain to always arrive in your email account as sometimes legitimate emails can end up being mark as spam.
If you add a contact or domain to your Block list, then email from them will not be delivered to you (unless they are also in your Safe list). Entries in your Safe list will always be delivered to your account, even if they are from a blocked server (though they are still scanned for viruses).
There are a couple of ways of adding contacts to your Block or Safe list.
1) After opening an email from them, you can find these options at the top of the Email.
Webmail

2) You can also access your Safe list and Block list from the My Account section. If you click on Spam Settings, you can manually add email addresses or domains to your Block or Safe list, and remove any addresses if you need to:


PLEASE NOTE: Disabling Spam and/or Virus scanning on your account will disable your Block/Safe list as they rely on these to function. If you find that your Block or Safe lists are not working as expected, please make sure these are enabled.
If you have any further issues regarding your Block/Safe list settings, please contact our helpdesk at help@aluminati.net
Files attached to an email on the cantab.net service must not total more than 25MB.
The main reason for this file size limit is security. Without these limits it would be possible for malicious users to bombard email servers with huge email attachments and ultimately crash the servers. Even if we were to increase the file size limit on our end, there is no way of ensuring that a recipient's server would accept a file of that size.
If the file attachment size is too big, and rejected by the recipient's server, you will usually be notified with what is known as a bounce message. These exist primarily to inform users that their email has not been received, and provides a brief reason why.
Should you wish to send a file to a recipient that is over 25MB in size (or has otherwise been rejected by their mail server) there are two alternatives available that would allow you to work around these limits:
- Using a cloud storage or FTP link (a solution such as Dropbox, Google Drive, etc.) can provide users with a link to download the file, this can then be inserted into an email.
- Using file compression software (such as Winzip, or the native functionality built into most operating systems) to make the file smaller for the purposes of attachment.


- Find out iPhone Model: https://support.apple.com/en-gb/HT201296
- Find out iPad Model: https://support.apple.com/en-gb/HT201471
- Find out iOS version: https://support.apple.com/en-us/HT201685
Adding a new email address


- Name - This will be your display name as well as what the account is called on your device.
- Email - Your full email address.
- Password - Your full email password.
- Description - You can add a description of the account in this field in order to identify the account easier (e.g. Work email).


- Name - This will be your display name as well as what the account is called on your device
- Email - Your full email address
- Description - You can add a description of the account in this field in order to identify the account easier (e.g. Work email)
- Incoming Host Name - mail.secure.aluminati.net
- Incoming Username - Your full email address
- Incoming Password - Your full email password
- Outgoing Host Name - mail.secure.aluminati.net
- Outgoing Username - Your full email address
- Outgoing Password - Your full email password


Editing an existing email address


- Name - This will be your display name as well as what the account is called on your device
- Email - Your full email address
- Description - You can add a description of the account in this field in order to identify the account easier (e.g. Work email)
- Incoming Host Name - mail.secure.aluminati.net
- Incoming Username - Your full email address
- Incoming Password - Your full email password


- Server - Enabled
- Host Name - mail.secure.aluminati.net
- Username - Your full email address
- Password - Your full email password
- Use SSL - Enabled
- Authentication - Password
- Server Port - 587 or 465
- Introduction
- Adding a new email address
- Editing an existing email address - Method One
- Editing an existing email address - Method Two
- Email are being received but are not sending
Adding a new email address


- Name - Set your display name, which will be used when sending emails from your Apple mail.
- Email Address - Enter your full email address.
- Password - Enter the password for your email address.

- Email address - Your full email address
- Username - Your full email address (again)
- Password - Your password for your email address
- Account Type - Select either IMAP or POP3
- Incoming Mail Server - mail.secure.aluminati.net
- Outgoing Mail Server - mail.secure.aluminati.net

Editing an existing email address - Method One


Editing an existing email address - Method Two


- Username: Your full email address
- Password: The password for this account
- Host Name: mail.secure.aluminati.net
- Automatically manage connection settings: Uncheck this option for the below options to appear
- IMAP Port: 993
- POP3 Port: 995
- Use TLS/SSL: Check this option
- Authentication: Password
- Account: Make sure the mail.secure.aluminati.net option is ticked (it should display as what you have named it)
- Username: Your full email address
- Password: The password for this account
- Host Name: mail.secure.aluminati.net
- Automatically manage connection settings: Uncheck this option for the below options to appear
- Port: Try 587 first, then 465 if it doesn't work
- Use TLS/SSL: Check this option
- Authentication: Password

Email are being received but are not sending


- Description: This is used to identify what this server is called. This can be anything you wish
- Username: Your full email address
- Password: The password for this account
- Host Name: mail.secure.aluminati.net
- Automatically manage connection settings: Uncheck this option for the below options to appear
- Port: Try 587 first, then 465 if it doesn't work
- Use TLS/SSL: Check this option
- Authentication: Password
Contents
- Introduction
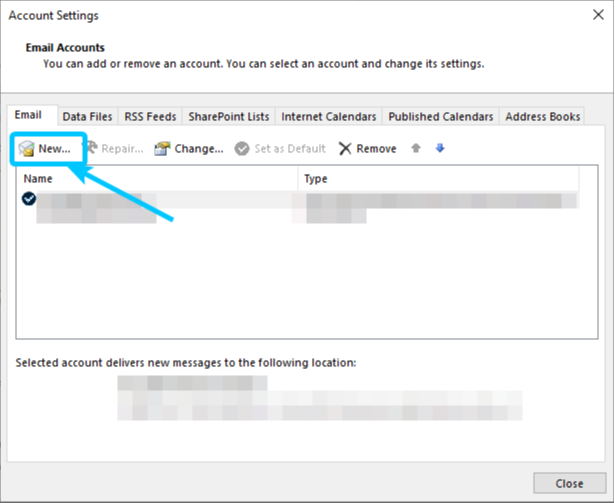
- Adding a new Email address - Method One
- Manually configuring a new account
- Adding a new Email address - Method Two
- Update an existing email
This guide supports Office 365, 2019 and 2016. This also supports Office 2013 and 2010 but the layout will be slightly different.
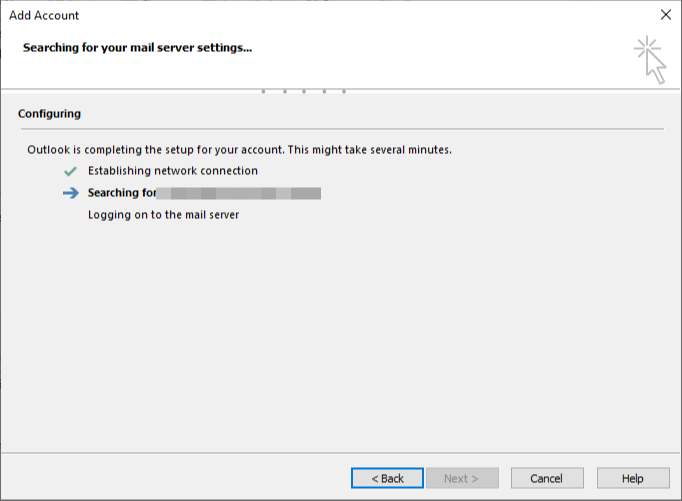
Signing straight in


- Server (Incoming and Outgoing) - mail.secure.aluminati.net
- IMAP Incoming Port - 993
- POP3 Incoming Port - 995
- Outgoing Port - 465
- Encryption method - SSL/TLS

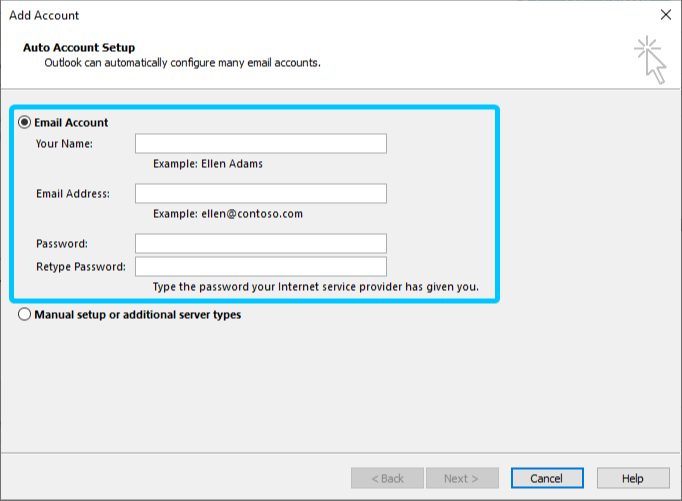
- Your Name: This can be anything as it is used to Identify your account
- Email address: Your full email address
- Password: Your accounts password
- Retype Password: Your accounts password again
Update an existing email


- Username - Your full email address
- Password - The password for your email address
- Server - mail.secure.aluminati.net
- IMAP Incoming Port - 993
- POP3 Incoming Port - 995
- Encryption method - SSL/TLS

- Server - mail.secure.aluminati.net
- Outgoing Port - 465
- Encryption method - SSL/TLS
- My outgoing (SMTP) server requires authentication - Checked with Use same settings... selected

Phone Policy
IT Support Team
The IT Support is here to support you with any technical query you may have about your account or our services. Our team operates entirely from our online Helpdesk via email, for which you can message at any time at help@aluminati.net or the unique help email address for your institution.
With that in mind, we would like to clarify that this team does not provide over the phone support due to the long resolution times needed for such queries. Our remote-only support means that the cost to your accounts are kept as low whilst still providing quick and reliable support.
We understand that in some instances, email-only support cannot be conducted in order to correct the error. For these exceptions, we offer a premium option which is chargeable on a time block basis.
Pricing
Gold and Silver customers, as a part of their subscription, are allowed two 15-minute free sessions within one term. Free and Pro accounts are required to pay the below standard fee.
- Free - £30 for a 15 minutes time slot
- Pro - £30 for a 15 minutes time slot
- Silver - Two free sessions a year
- Gold - Two free sessions a year
Payment Methods
All Phone Support sessions will need to be paid for via a Bank Transfer.
Remote software
When you require a phone support appointment, we will ask you to install remote access software so that we can view and/or take control of your device.
Teamviewer is the best software available for remote access and we use this for all over-the-phone troubleshooting.
Before your appointment, you will need to have this installed. All you need to do is click and download:
- Windows - https://download.teamviewer.com/download/TeamViewerQS.exe
- Mac - https://download.teamviewer.com/download/TeamViewerQS.dmg
- Andriod - https://play.google.com/store/apps/details?id=com.teamviewer.quicksupport.market
- IOS - https://itunes.apple.com/us/app/teamviewer-quicksupport/id661649585
Appointments
All Phone Support sessions will have to be booked in advance and are up to one hour in length (four - fifteen minute slots).
When a support ticket is escalated into a phone appointment, you will be requested to prepare for the phone call with all the necessary information that is needed for troubleshooting, as well as having the remote software pre-installed.
The support team will then confirm a date with and request your phone number. Appointments can be canceled and rescheduled without notice if the user wishes. There is no penalty for this.
Our support team will work with you to troubleshoot and correct the issue using the Teamviewer software, which will allow us to view your screen as well as make changes directly to your account.
When the call has been completed, a follow-up email will be send by our support team to confirm:
- The time, date and duration of the call
- Clarification as to whether this is the 1st or 2nd appointment of this subscription term
- A description of the issue
- A summary of the resolution completed on the call